Every rider talks about “feel,” but very few can explain what they’re actually feeling—or how to engineer more of it on purpose. Precision on a motorcycle isn’t magic; it’s a trainable interface between your brain, your hands, your feet, and two tiny contact patches of rubber doing violent physics at speed. The difference between a sketchy corner and a clean one usually isn’t bravery—it’s how cleanly you manage micro-inputs.
This is about riding like an engineer who happens to be addicted to lean angle. We’re going to zoom in on the tiny control decisions that stack into stability, grip, and confidence. If you’ve ever wanted to translate “I know it when I feel it” into “I can reproduce this every time,” this is your playbook.
1. Throttle As a Load Tool, Not an On/Off Switch
Most riders think of the throttle as “speed control.” On a technical level, it’s actually a load control device for the rear tire and chassis. The engine’s torque delivery, combined with gearing, determines how much longitudinal load you’re applying to the rear contact patch—and how that load moves weight fore and aft through the suspension.
On corner exit, your goal is not “add speed,” it’s “stabilize the bike by building rear grip progressively.” Rolling from maintenance throttle to acceleration should be a smooth, linear ramp, not a step. Imagine you’re “pressurizing” the rear tire: too fast and you break traction, too slow and you never settle the chassis. On fuel‑injected bikes, especially ride‑by‑wire, start practicing ultra‑small adjustments: 1–2 mm of throttle tube movement, held steady for full seconds, then adjusted again. You’re programming your right hand to think in percentages, not in “closed vs. open.”
A useful drill: in a safe, open stretch, choose a gear that puts you in the midrange and ride at a fixed speed using only throttle—no clutch, no brake. Try holding 40 mph, then 45, then 50, adjusting as smoothly as possible. Feel how micro‑inputs change engine braking and weight transfer. The more resolution you can feel in your own throttle hand, the more “bandwidth” you’ll have to manage traction when it matters.
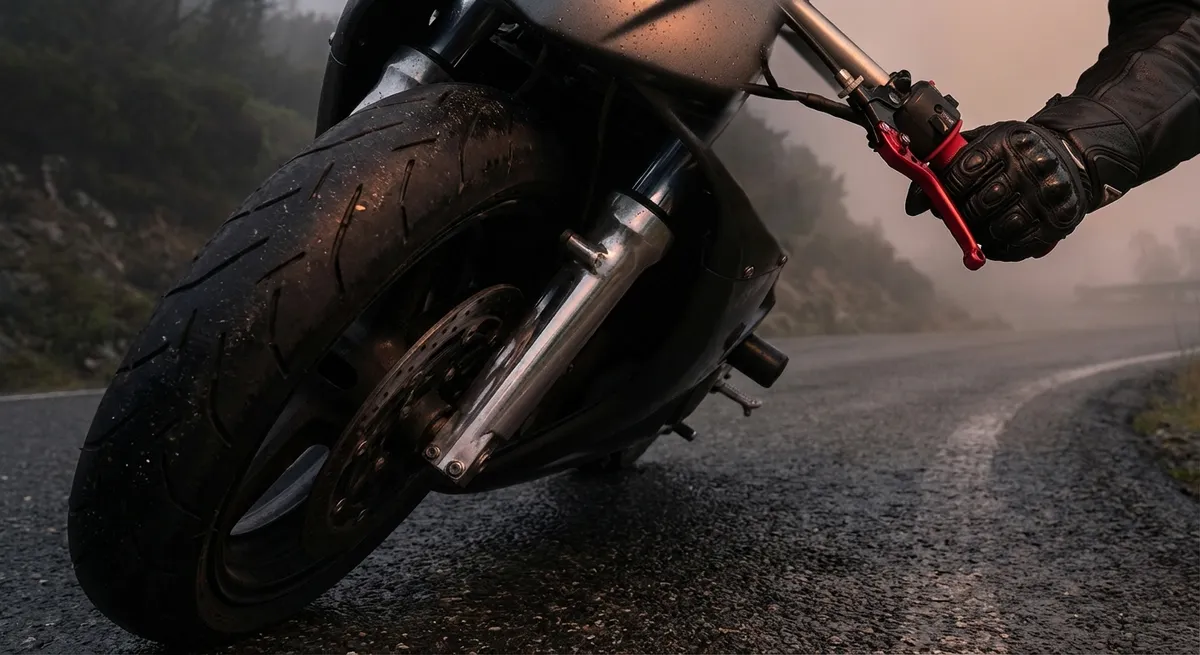
2. Front Brake Modulation: Building a Pressure Curve, Not Just Stopping
The front brake is your primary tool for sculpting chassis geometry on entry—not just for reducing speed. Braking compresses the fork, steepens rake, shortens trail, and loads the front tire. How you apply and release that load determines whether the bike feels planted or nervous.
You want to think in terms of a pressure curve: a clean initial bite, a controlled build to peak pressure, then a smooth taper as you release. Grabbing the lever like a light switch shocks the fork, blows through the top of the travel, and reduces your margin for grip. Instead, imagine “hooking” into the lever with your index and middle finger, then squeezing with progressive intention. The first 10–20% of lever travel is where you’re setting the front tire’s workload; be deliberate there.
Practice trail braking in a low‑risk environment: start by braking firmly in a straight line, then—as you tip in—gradually release pressure, aiming to fully release the brake as you approach the apex. Don’t chase lap times; chase a consistent, repeatable feel in the lever and fork. You’re training your brain to understand how much deceleration the front tire can hold while also handling cornering forces. Over time, that “I’m about to tuck the front” feeling becomes a recognizable warning, not a surprise.
3. Steering Inputs: Bar Pressure, Not Bar Fight
Motorcycles don’t actually “turn” because you twist the bars in the direction you want to go; they lean because you create a moment that tips the bike. Countersteering is the macro principle, but the finesse lives in how precisely you load the bars and how much of your upper body you involve.
Instead of “pushing the inside bar,” think in terms of “pressuring the inside grip while stabilizing with the outside.” Your outside hand isn’t just a passenger; it’s a key part of the control loop. A light, supportive pull on the outside bar gives you more range and precision in the inside push. Keep your elbows slightly bent and “open,” not locked—this gives your upper body a suspension effect, filtering out road shock without feeding tension into the bars.
Another layer: separate steering input from body position input. Move your torso and hips first (or at least simultaneously), then add steering pressure. If you lead with the bars and let your body lag, the bike will feel twitchy and reluctant; if your body goes with the direction of lean, your bar input can get smaller and more precise. Try this drill: in a long sweeper, consciously reduce bar pressure until you’re barely holding them, and let your lower body and core do more of the directional work. You’ll feel the bike settle into a more neutral state where you’re guiding, not wrestling.
4. Footwork and Peg Loading: The Underrated Stability System
Most riders “stand” on the pegs only when off‑road or stretching on a highway. They’re missing out on one of the most precise control tools on the chassis: peg load distribution. Loading a peg changes how the bike reacts to bumps, weight transfer, and lean—especially on corner entry and transitions.
Think of the pegs as your primary connection to the frame. On corner entry, a subtle increase in pressure on the inside peg can help initiate lean, but the real magic is using your outside peg to anchor your body. Driving weight through the outside peg (paired with a locked‑in knee at the tank) unloads your upper body, letting your wrists and hands relax. That directly translates to less mid‑corner bar input and a calmer chassis.
In quick left‑right transitions (like chicanes or S‑bends), focus on “pivoting” your mass over the pegs, not yanking the bars. Pre‑load the upcoming outside peg just before the direction change; you’ll feel the bike respond faster and more predictably. A simple drill: on a familiar twisty road, consciously reduce how much you “hang” on the bars and instead drive more pressure through your pegs and tank contact. The more your lower body manages your weight, the more your upper body can purely steer and sense feedback.
5. Reading Traction Through Suspension: Turning Feel Into Data
Grip is invisible, but it’s not mysterious. Your suspension is constantly broadcasting the state of your contact patches—you just need to learn the language. Instead of thinking “the tire suddenly let go,” think “my fork or shock was already telling me it was out of margin.”
On the front, pay attention to the last 20–30% of fork stroke under braking and corner entry. A slightly “chattering” feel, or a light, fast vibration at the lever under heavy load, can signal that you’re on the edge of available grip or that your damping is too aggressive for the surface. A fork that feels harsh on sharp bumps mid‑corner might be over‑damped in compression, reducing how much the tire can follow imperfect pavement.
On the rear, listen for a “pogo” sensation on throttle exit or a vague, wallowy feel when picking the bike up out of a corner. That usually means the shock is under‑damped in rebound, letting the rear extend too fast and unloading the tire between bumps. Conversely, if the rear feels like it “packs down” and sits lower with each successive bump, you may have too much rebound damping, which again costs grip because the tire can’t reset its available travel.
You don’t need to be a suspension tuner to benefit. Create a simple mental checklist: front feel under heavy braking, front feel at max lean, rear feel mid‑corner, rear feel on exit. When something feels off, describe it in physical terms—harsh, vague, chattery, wallowy—instead of just “bad” or “sketchy.” That mental precision will guide better decisions, whether you’re adjusting clickers yourself or working with a shop.
Conclusion
Riding at a high level isn’t about secret lines or mythical bravery; it’s about upgrading your control resolution. Throttle becomes a load tool, brakes become geometry scalers, bars become lean translators, pegs become stability anchors, and suspension becomes a real‑time telemetry system you can feel in your bones.
When you start thinking of every input as a micro‑adjustment to grip and balance, your riding stops being reactive and starts becoming deliberate. That’s where confidence comes from—not hoping the bike will save you, but knowing exactly what you’re asking it to do and why it responds the way it does. Share this with the rider in your group who’s fast but “doesn’t know how”—and start turning instinct into engineered, repeatable control.
Key Takeaway
The most important thing to remember from this article is that this information can change how you think about Riding Tips.


